Pages

Monday, 22 September 2014

Etsy Shop Opened!!!

Things have been pretty quiet here as I've been slaving away on a commissioned dress.

Yellow linen cotehardie
Anyway it's finally finished and for the last few days I've been getting organised to open an etsy store. I know personally that finding decent garb online can be incredibly difficult, and when you do find something the international shipping rates are insane. So good news if you're located in Australia because you can now get quality handmade authentic medieval and renaissance costumes from my new Etsy store!


So far I have listed what you see above - viking male and female outfits, a cloak, chemise and cotehardie. There will be more coming soon so add me to your favourite shops and keep checking. Otherwise send me a message if you want something I haven't listed yet

:)

Thursday, 28 August 2014

Late period chemise

About a month ago I made a deal with a friend. She gave me a whole pile of leather in exchange for me sewing her a flemish outfit. Win win if you ask me.

So yesterday I made the chemise. From start to finish it took me about 8 hours including drawing up the pattern. I still have to finish the neckline but I need her to try it on first as I don't have a dress form or anything. If I tried to finish it now chances are her boobs could end up falling out of it or it might choke her. So I'm waiting.

I based the pattern off this one here.

FlemishChemisePartlet
Flemish chemise pattern by Vanessa Agnes Nessayem
I hadn't used this pattern before but I'm quite pleased with how it turned out. Last time I made a chemise that wasn't a big poofy Italian style one it turned out a bit retarded. The arms were too short and tight and the shape was just all wrong. To be fair I wasn't very experienced in pattern drafting back then so I probably made heaps of mistakes. But I think I did allright this time around.

I wanted this chemise to be pretty versatile as my friend doesn't have a lot of garb. She could wear this with any later period style I think. I also wanted the sleeves to be able to be rolled up so I changed the sleeve pattern to be a straight and gathered into a cuff. That way they are nice a fitted when she wants to wear sleeves, but can be rolled up out of the way if need be. It's also only knee length. I made a floor length chemise once and I hated it.

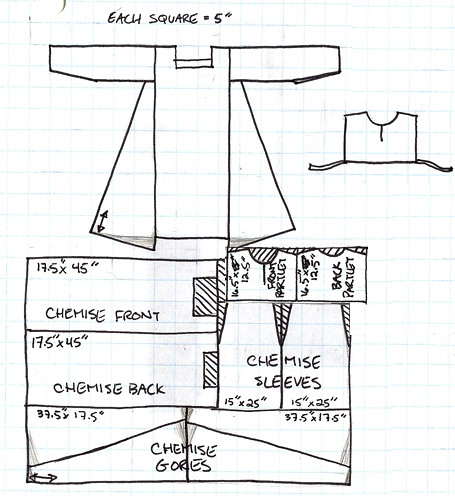
So this is the pattern I drafted for Morgaine's measurements.

Flemish chemise pattern
So if you are the the exact same size as my friend (whose measurements I included above just in case someone is) then you're in luck! I've drafted you a free chemise pattern! If not I'm sorry. Get your calculator out. Or you can plug your measurements into Drea Leed's smock generator but that's what I tried to use last time and came out with something strange. I find it helps to understand how to draft a pattern so that you can make the necessary adjustments for yourself that a generator or a commercial pattern won't do. My body shape in particular doesn't like "choose the bigger measurement - bust or hips - and make that the width of your body piece" because my shoulders aren't as broad as the rest of me and if I follow a pattern like that my sleeves end up attaching half way down my arms. But with this pattern I can make my shoulder to shoulder measurement the width of the body piece, and add the extra room in for the bust/hips using the gores. So yeah I'll be using this one from now on.

I finally got to benefit from my large aldi sewing table too. It made rolling out fabric and drawing pattern pieces so much easier. And I love how medieval patterns have so little fabric wastage. All up I used about 2 metres of linen.
Pattern pieces cut out, and tiny pile of scraps
I didn't actually take many photos of the construction as it is pretty similar to a standard t-tunic. Join the two body pieces at the top. Sew the sleeves to the body. Add the gores. Cut the head hole.

That's something I always struggled with when I started my costuming journey. How big to make the head hole. And how to get it the right shape. Many times I cut a head hole way to big or too small or off centre. I've made every mistake in the book. But I eventually found a way that works. It's just big enough for my head and more importantly puts me head in the right spot. When I've got it on I trace the neckline shape I want in the mirror. And incidentally it is ten times easier to mark out the head hole before you sew up the side seams.
Head hole shape
Sew the side seams. Gather the sleeves up. Attach the cuff. 

I included photos of this as it can be fiddly folding everything the right way so it sits nicely.

Start by machine sewing the gathered sleeve onto on side of the cuff but don't sew the 1.5cm seam allowance at each end.
Machine sew the gathered sleeve to the cuff,
leaving 1.5cm at each end open.
Fold the raw edge of the sleeve over twice and pin
Fold the cuff SA over and pin.
Do it to both sides
Fold up the bottom edge of the cuff 1.5 cm and iron flat
Refold the SA on the ends of the cuff
Fold the cuff in half so that the ironed edge meets up with the row of stitching,
and the corners match up perfectly
Pin in place
Before you hand sew that together, work out what type of cuff fastening you want. I chose buttons and luceted button loops.
Pewter fleur de lis buttons
So I needed to stop and lucet the button loops. It didn't take too long as they are only about 3cm long each. I used linen thread so they were nice and thin. I also left nice long ends on my luceting so I could use the ends to sew them in place. I don't know if you've ever tried to sew through a luceted cord but let me tell you your fingers will hate you for it.
Unfold the end of the cuff and sew your button loops in
Refold and pin

Whipstich edges and along the cuff
Sew the buttons on
Finished Sleeve Cuff

Hem the bottom. And at some point when I see her next, finish the neckline.

So this is what it looks like at the moment

Front
Back
It might be a few weeks before I see her again to mark and finish the neckline. I'll update with finished photos when it's done. I'm even thinking of setting up an etsy store to sell them and other things later down the track too. So stay tuned ;)

Monday, 21 July 2014

How to build a tablet weaving loom in only 7 years!

Yes you read that right. 7 years. Not 7 minutes, or even 7 hours.

I started these looms when I first learnt how to tablet weave, which was in 2007. And yes its now 2014. But they are finished!

They are really basic. It was just one length of pine cut into 6 pieces. I didn't even cut it myself, got someone else to do it (this was my pre-power-tools-do-selfer days). I did varnish it myself way back when. My first (and quite possibly last) foray into oil based products. Clean up was a pain in the bum I tell you. And then thats where it got left. Random little varnished pieces of wood that moved house three times before being contructed.

The end bits are glued and screwed, and had a hole drilled in them for the threaded rod. The guy at bunnings (I love those guys) gave me a really nifty tip for how to screw it in. You put two nuts on the rod and tighten them against each other. Then you use a spanner on only the top nut and screw it in like a bolt with a spanner. So lets just pretend that was my brilliant idea :) I will be using the same technique for the tension peg on my inkle loom when I ever get around to it.

Carly's Tablet Weaving Loom
My tablet weaving loom, almost finished
You can see the nuts on the right where I haven't taken them off after screwing in the rod
I broke the hacksaw blade on the last cut. So frustrating. And then when I tried to screw it in something bizarre happened and it just kept chewing up the timber and spinning around without going any deeper until the hole was too big. So I just drilled a new hole. Yes it's annoying and my OCD nature is screaming at me that the peg is not in the centre but not so much that I really cared about trying to fix it even if I was able.
Looms Finished
So the larger one with the dodgy extra hole is for me and the smaller one for my friend Carly (who better be reading this :P). It has been promised as her christmas and birthday present for the last seven years. I'll have to actually get her a present from now on.

Wednesday, 2 July 2014

Catch up time!

Well after losing my phone last month my insurance replacement finally arrived. Which means now I can take photos again! I've still been working on various bits and pieces in the interim but it didn't seem worthwhile posting anything without accompanying pictures. So today I am hoping to catch you all up on what I have been working on.

My red kirtle bodice is basically complete (except for the bottom edge). I forced myself through the torture of the silk facings and to be honest once I set my mind to it I got into a bit of a rhythym. It still took a couple of days but boy was I happy when I finished!
Kirtle bodice finished
Next it was the eyelets (which were already done in the above photo). All 40 of them. For those who haven't sewn eyelets before there is a pretty good tutorial here. I did the buttonhole stitch eyelets that she describes, but I have the buttonhole stitch side on the inside (I don't think it's as pretty as the other side) so there is a lot of turning the fabric over when you pull each stitch tight to make sure it sits where you want it to. Next time I'm going to try the satin stitch ones and see if they are any easier.
Reverse view of eyelets showing buttonhole stitches (if you have really good eyes!)
Before that though, you need to work out where you are going to sew them. Spiral lacing seems to have been much more common in period than cross lacing, so now whenever I make garb I spiral lace. It really doesn't make a difference functionally but it feels more accurate and it uses less cord (which means less time luceting!). There is a really good article on the Festive Attyre site which explains all about how to space your holes to get the right look. I think my eyelets on this bodice are 3/4" apart (apart from the extra one at the top and bottom) and 1/2" away from the edge. To work this out I measure the total length of the edge where the eyelets will be and try dividing it by something to get an even-ish sort of number. Then I get some big berry pins and go along and mark the spots so I can see if they are too close/far away from each other, and even too close/far away from the edge of the fabric. I pin out a couple of different waysand then pick the one that looks best. It's often a different configuration on each piece of garb.
lace2
The Zen of Spiral Lacing Spacing from Festive Attyre
Now I have done plenty of hand sewn eyelets before but the last lot I did through a canvas interlining ended up so small I could barely get my teeny tiny (read thin) lacing cord through them. Luckily I was a bit wiser this time. The trick is to do as few stitches as will hold the hole open, and keep reopening the hole with the awl. My first few eyelets (way back when...) I went around three or four times to make sure I covered the ENTIRE edge because I thought that was what you were supposed to do. They ended up so tiny and I had no idea what I had done wrong. And over here at The Renaissance Tailor is where I learnt that the holes will close themselves up as you sew if you let them. I was not going to let that happen again. I stabbed those suckers about 5 times each! And now they can even fit my normal thickness of lacing through (luceted 8 ply crochet cotton) so I'm quite happy. (Note: use something solid as a base to rest your awl on and push your fabric down onto it. I had quite a sore knee, and then a dented wooden chair until I discovered the kitchen bench worked quite well.)
After that I finally got to cut the skirt pieces out. The back skirt piece is a plain rectangle while the front is shaped slightly as that was what was done in the time period I'm working in (according the the authors of The Tudor Tailor anyway, which is good enough for me).

Skirt pattern from The Tudor Tailor
The sides seams of the skirt have been sewn up by hand using back stitch, leaving about an 8 inch gap at the top where the bodice laces. I'm up to flat felling the seams which is a period technique to finish the edges of a seam so they don't fray. The wool I'm using has been felted so it probably wouldn't fray much anyway, but the skirt isn't lined and I'm a bit OCD about the details like that. I know they probably wouldn't have bothered in period but leave me alone! I hate raw edges! I've finished one side and started pinning the other one down to sew. After that I just need to cartridge pleat the skirt and attach it to the bodice. I haven't quite worked out whether I should finish the bottom edge of the bodice before I do this or not? Any suggestions?


And that's where my kirtle is at. Yay for progress!

I'm still plodding away at the blue and brown sleeves (one is finished).
One sleeve finished

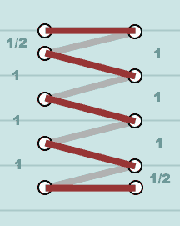
After finishing the criss cross inkle leg wraps (which totally don't stay up by the way. I really need to do the proper thick spiral ones) I rewarped my inkle loom with some thin red and white crochet cotton so I could experiment with pick patterns. I pretty much just plodded along following the instructions here until I knew what I was doing. Then I wanted to steam ahead and do a stags head for my husband but I didn't make my band wide enough. Next time though!

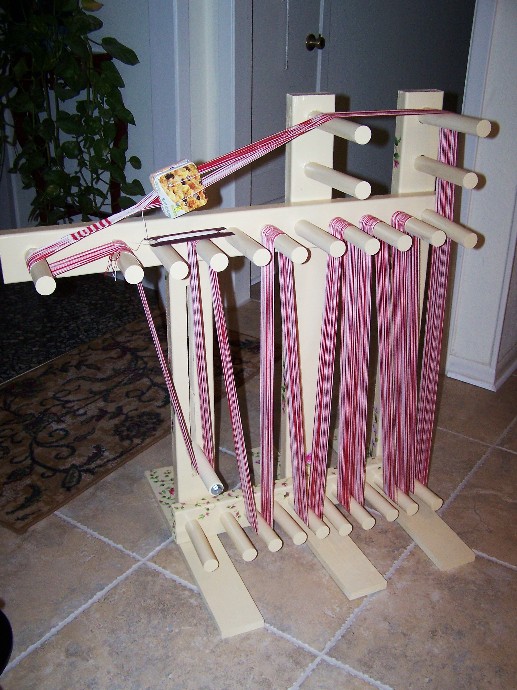
I am also fairly determined to build this floor sized inkle loom so I can weave lots and lots of braid at a time and then sell it but I will dedicate another post to that.


I reorganised my sewing room and have plans to install some fabric storage drawers/shelves.

I started knitting some socks but I've only done a few rows because I started reading a book in bed instead. I've finished it now though so it will be back to sock knitting before sleep.

I'm also researching menus and other things for a weekend long camping event I hope to run in November. There will definitely be pancakes and waffles!
The Pancake Bakery by Pieter Aertsen 1560
I learnt how to make lace at the last A&S day which was pretty exciting. I came home so determined to try this amazing pattern and I just haven't had a chance to sit down and start it. But I couldn't believe how easy lace making is. It's really just made up of different combinations of crosses and twists! I will get around to trying that pattern but I need to finish up a few other things first.

So that's what I've been up to. Hope you guys didn't miss me too much. Actually that's a total lie. I really hope you were all devastated by my blogging absence and you kept refreshing the page to see if I had put up a post yet. I am that vain. But lets pretend I didn't admit that ;)

Thursday, 5 June 2014

The tub of unfinished-ness


I mentioned previously that I'm not very good at sticking with one thing, and so I always have multiple projects going. What I mean by that is I actually have a giant tub in my sewing room (aka my son's bedroom, but what does a 10 month old need with a bedroom anyway?) full of half finished bits and pieces. Stuff that I started and got bored with, or didn't have the materials to finish, or didn't know how to finish, or just forgot about after starting ten new things. Some of it was begun YEARS ago (like the blue tablet woven belt I mentioned here among others), and some of it much more recently (like my french kirtle). So this week I've been trying to work on some of the things in my unfinished tub. Even though I really really want to start on Dan's viking kaftan!!!

So, first things first. At rowany festival 2011/2? I went to a knitted sock A&S class. Everything went along nicely. I've done heaps of knitting before. Just before the class ended the lady running it said "If you get stuck when you get to turning the heel come and see me in my campsite on Monday". Well we only went up for the day that year. And I got stuck turning the heel didn't I. Well not even the actual turning of the heel, but the section called "Divide for Heel".
Miniature sock pattern, based on Carmoyle stocking.
The picture has been blanked out at the request of the author.


I don't know about you but it just really confused me how it was written, and never having knitted a sock before I had no idea what I was doing. So it got abandoned for a few years. But this year before Panther Hunt I contacted one of the ladies that lives up in Dismal Fogs (Lithgow, NSW - Hi again Kylie!) who I know has knitted socks before if she could help me. It confused her a bit too (which made me feel better) but since she knew the anatomy of a sock she helped me out. We worked out that the stitches needed to be 8 on needle 1, 15 on needle 2 (or a stitch holder) for the instep, and the other 7 on needle three. Then you knit the 8 on needle 1, turn the work around and knit those 8 again, plue the 7 on needle three. So you have 15 stitches on the holder, and 15 on a single needle that you are working on back and forward.

From that point on I was pretty right. I had to use a few you tube videos for the bind off, and then again to pick up the stitches, but this was the result.
Mini sock of cuteness!!!
It's pretty small, but I was really hoping it would fit on Jonathon's foot.
It didn't
So now it's basically a toy sock for grace's dolls. The cream wool I bought on Tuesday is for a real sized pair for myself. If anyone wants the larger pattern contact me and I will email it to you. I need to knit a swatch first to gauge the tension so it ends up the right size. But that would come under "starting a new project" which is forbidden this week until lace-making on Sunday.

Another thing I've been working on is a pair of sleeves that I started with the intention of having something warm for festival (hah, yeah I know). A few years back I made a dress from a commercial pattern that had an under and an oversleeve and I accidently cut them from the same fabric. So I had these extra sleeve pieces in this blue material. I had about a metre of this brown wool blend that I had picked up from the salvos for cheap that probably wouldn't make more than sleeves anyway. So I cut them out of the wool in the same shape to make reversible sleeves. I am handsewing them so I used backstitch around the outside, leave a gap so I could turn them the right way out, then whipstitched the opening closed.
Whipstitched opening on the left, invisible backstitching on the right
Now I am using ladder stitch to sew up the seam like I would for a stuffed toy.
Close up of ladder stitch
You can see below its quite invisible from both sides as the stitches are hidden in the folds, and it also lies quite flat


They are still in progress, but what's that I spy underneath? Weaving? Yes it is. 

Why oh why is my weave so open?
I've only done a bit. I'm not sure why, but the weaving is a lot more open than I was hoping for. I think I might need a different reed or thicker yarn. Hopefully it will shrink up in the wash? We'll see. And yes the pictures on top of it were painted by my daughter at preschool. I'm going to put them up in my sewing room because they are awesome :)

And that brings me to my kirtle. I picked it up yesterday and forced myself to continue with attaching the silk facing on the side seams. It's really depressing when I finish a row of stitching and realise I need to do it three more times, and then on the lining, and then on the other side seam. My finger is also quite sore from pushing the needle through the canvas. I need to dig out my little thimble because I really really want to finish this dress! It better turn out as amazing as I'm hoping it will.

Tuesday, 3 June 2014

Viking Kaftan Planning

Damn spotlight and it's 40% off sale. I am now broke. And I have a whole list of new projects, none of which are for me.
Navy blue cotton/linen - Daniel cloak lining
Khaki cotton/linen - Dan viking tunic
Blue cotton velveteen - Daniel doublet
Green/white herringbone wool - Daniel kaftan
Grey wool - Daniel cloak
Same grey wool - Dad kaftan
The viking kaftan is probably first on the list for Daniel, and it will be made something like this. A lot of the kaftan recreations I found online referenced this picture and pattern, but it took a bit of searching to find the actual article because the link that kept coming up (http://users.bigpond.net.au/quarfwa/miklagard/Costume/Rus/Trader/Rus_description.htm) was broken. Luckily the viking answer lady had the name of the author (Peter Beatson), so I searched and found it here. I love how detailed and well documented it all is. Makes things easy for me :)
Peter Beatson's Rus Trader Outfit
Kaftan Pattern
I'm not sure I will get to the silk embroidery around the collar and cuffs. I would prefer to tablet weave something fancy, but I will have to search a bit more and see if I can find evidence of that.

My dad is going to make the other cross-over style of kaftan.

Rune showing cross-over kaftan from here
Cross-over kaftan pattern from here
I must have stumbled across the best viking resource page here. It has patterns and reconstructions and stuff from everywhere on the net all in one place as clothing guides, sorted by region. I love it! So much reading to do now.

Oh and by the way, earlier when I said I didn't buy anything for myself... technically not true. I bought three balls of cotton and some pins for a lacemaking A&S class next Sunday which I am pretty excited about, and also a few balls of wool to make myself some socks. Stay tuned :)
Perle 8 cotton and berry pins for lace making
8 ply cream wool for knitting socks