Pages

Showing posts with label Kirtle. Show all posts

Saturday, 13 December 2014

French Kirtle Finished

When I left you here back in July I was up to cartridge pleating the skirt of my red kirtle and attaching it to the bodice.

I decided to finish the bottom edge of the bodice with some poly fleece bias binding rather than hemming in order to give it a tiny bit more length. It's just a little bit shorter than I had intended and I didn't want to sacrifice any more length by hemming. And since it is an underdress the visual aesthetic doesn't really matter.

Before attaching the bias I put the bodice on, laced it up and then tried to adjust the three layers (outer wool, canvas interlining and cotton lining) to minimise any wrinkles. I dig this by tugging and stretching and pinning. The wool layer was the one that gave the most. It's more of an art than a science and it's still not perfect but to get rid of those last wrinkles under the bust I would need a corset.

Bodice layers adjusted and pinned before attaching bias.

With bias attached
Next was the skirt.

I finished flat felling the seams

And hemmed the top and bottom edges

Next I used chalk to mark the top edge at equal intervals (i think they were an inch apart)

Then I used some strong upholstery thread to sew two rows of  running stitch using the chalk marks (only one shown)

Gather to the desired length.

Pleated skirt front
To attach the skirt to the bottom edge of the bodice, I layed the pleated skirt over the bodice, right sides facing each other, and spread the pleats out evenly. I only had a really limited amount of fabric for this dress so the pleats aren't really close enough together. But again it's only an underdress.

Using upholstery thread again, I used two or three firm stitches to catch each pleat (half way between the chalk marks) to the bodice.
View of wrong side
View of a side seam/skirt opening

View of right side

Completed dress - front view

Completed dress - back view

As worn at Rowany Yule Feast, Dec 13 2014
I learnt a lot of things that I will be keeping in mind as I make the overdress. Particularly giving myself enough length in the bodice to finish the bottom edge (the bias is really obvious in photos). It's also really really tight so I need to remember to add a little mit of ease for the over gown. And definitely need a nice full skirt.

Thank you again to Lady Christine Duvant who told me last night that half of Ireland has this amazing pattern now :)

Wednesday, 2 July 2014

Catch up time!

Well after losing my phone last month my insurance replacement finally arrived. Which means now I can take photos again! I've still been working on various bits and pieces in the interim but it didn't seem worthwhile posting anything without accompanying pictures. So today I am hoping to catch you all up on what I have been working on.

My red kirtle bodice is basically complete (except for the bottom edge). I forced myself through the torture of the silk facings and to be honest once I set my mind to it I got into a bit of a rhythym. It still took a couple of days but boy was I happy when I finished!
Kirtle bodice finished
Next it was the eyelets (which were already done in the above photo). All 40 of them. For those who haven't sewn eyelets before there is a pretty good tutorial here. I did the buttonhole stitch eyelets that she describes, but I have the buttonhole stitch side on the inside (I don't think it's as pretty as the other side) so there is a lot of turning the fabric over when you pull each stitch tight to make sure it sits where you want it to. Next time I'm going to try the satin stitch ones and see if they are any easier.
Reverse view of eyelets showing buttonhole stitches (if you have really good eyes!)
Before that though, you need to work out where you are going to sew them. Spiral lacing seems to have been much more common in period than cross lacing, so now whenever I make garb I spiral lace. It really doesn't make a difference functionally but it feels more accurate and it uses less cord (which means less time luceting!). There is a really good article on the Festive Attyre site which explains all about how to space your holes to get the right look. I think my eyelets on this bodice are 3/4" apart (apart from the extra one at the top and bottom) and 1/2" away from the edge. To work this out I measure the total length of the edge where the eyelets will be and try dividing it by something to get an even-ish sort of number. Then I get some big berry pins and go along and mark the spots so I can see if they are too close/far away from each other, and even too close/far away from the edge of the fabric. I pin out a couple of different waysand then pick the one that looks best. It's often a different configuration on each piece of garb.
lace2
The Zen of Spiral Lacing Spacing from Festive Attyre
Now I have done plenty of hand sewn eyelets before but the last lot I did through a canvas interlining ended up so small I could barely get my teeny tiny (read thin) lacing cord through them. Luckily I was a bit wiser this time. The trick is to do as few stitches as will hold the hole open, and keep reopening the hole with the awl. My first few eyelets (way back when...) I went around three or four times to make sure I covered the ENTIRE edge because I thought that was what you were supposed to do. They ended up so tiny and I had no idea what I had done wrong. And over here at The Renaissance Tailor is where I learnt that the holes will close themselves up as you sew if you let them. I was not going to let that happen again. I stabbed those suckers about 5 times each! And now they can even fit my normal thickness of lacing through (luceted 8 ply crochet cotton) so I'm quite happy. (Note: use something solid as a base to rest your awl on and push your fabric down onto it. I had quite a sore knee, and then a dented wooden chair until I discovered the kitchen bench worked quite well.)
After that I finally got to cut the skirt pieces out. The back skirt piece is a plain rectangle while the front is shaped slightly as that was what was done in the time period I'm working in (according the the authors of The Tudor Tailor anyway, which is good enough for me).

Skirt pattern from The Tudor Tailor
The sides seams of the skirt have been sewn up by hand using back stitch, leaving about an 8 inch gap at the top where the bodice laces. I'm up to flat felling the seams which is a period technique to finish the edges of a seam so they don't fray. The wool I'm using has been felted so it probably wouldn't fray much anyway, but the skirt isn't lined and I'm a bit OCD about the details like that. I know they probably wouldn't have bothered in period but leave me alone! I hate raw edges! I've finished one side and started pinning the other one down to sew. After that I just need to cartridge pleat the skirt and attach it to the bodice. I haven't quite worked out whether I should finish the bottom edge of the bodice before I do this or not? Any suggestions?


And that's where my kirtle is at. Yay for progress!

I'm still plodding away at the blue and brown sleeves (one is finished).
One sleeve finished

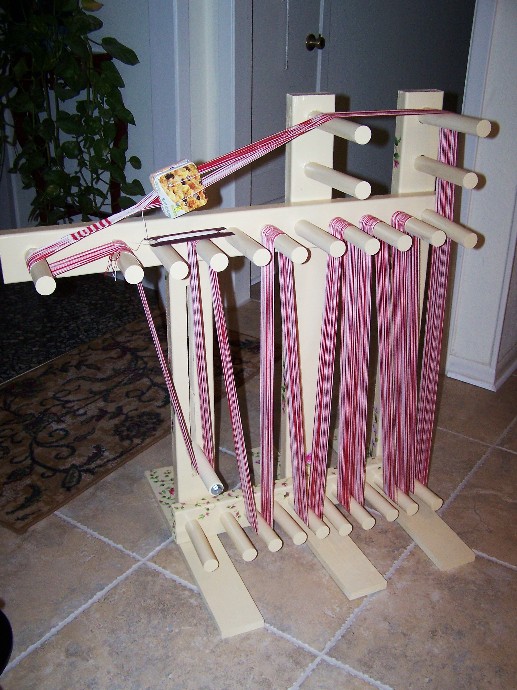
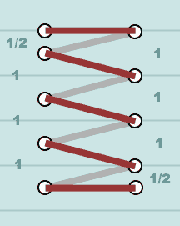
After finishing the criss cross inkle leg wraps (which totally don't stay up by the way. I really need to do the proper thick spiral ones) I rewarped my inkle loom with some thin red and white crochet cotton so I could experiment with pick patterns. I pretty much just plodded along following the instructions here until I knew what I was doing. Then I wanted to steam ahead and do a stags head for my husband but I didn't make my band wide enough. Next time though!

I am also fairly determined to build this floor sized inkle loom so I can weave lots and lots of braid at a time and then sell it but I will dedicate another post to that.


I reorganised my sewing room and have plans to install some fabric storage drawers/shelves.

I started knitting some socks but I've only done a few rows because I started reading a book in bed instead. I've finished it now though so it will be back to sock knitting before sleep.

I'm also researching menus and other things for a weekend long camping event I hope to run in November. There will definitely be pancakes and waffles!
The Pancake Bakery by Pieter Aertsen 1560
I learnt how to make lace at the last A&S day which was pretty exciting. I came home so determined to try this amazing pattern and I just haven't had a chance to sit down and start it. But I couldn't believe how easy lace making is. It's really just made up of different combinations of crosses and twists! I will get around to trying that pattern but I need to finish up a few other things first.

So that's what I've been up to. Hope you guys didn't miss me too much. Actually that's a total lie. I really hope you were all devastated by my blogging absence and you kept refreshing the page to see if I had put up a post yet. I am that vain. But lets pretend I didn't admit that ;)

Tuesday, 13 May 2014

Viking Pants Progress Aids Kirtle Facing Procrastination


Sounds a bit like a costuming news headline.

So when I last posted, I had almost finished the neckline of my kirtle. Well that's done now and it looks pretty awesome. I plodded away and got the facing sewn onto the lining the same way as I described here. Then I was finally able to invisible stitch the lining to the wool at the neckline. I used the same technique I would use to do a blind hem, and it was only afterwards that I though about using a ladder stitch (which I have only ever used to sew up stuffed toys). I guess it doesn't really make much difference as long as you can't see it after all.
Invisible stitch 1 - Blind Hem
Invisible stitch 2 - Ladder Stitch

I did have progress photos to post, but alas my phone updated over the weekend and decided it wanted to delete thousands of photos (including many of my kids *super upset face*) so I can only show you what it looks like now. Excuse the flash which is making it look pink on my screen.
Kirtle bodice with finished neckline
Close up of invisible stitching. Can you see it?
So I had that done by Saturday night and I was so keen to stitch up the sides so I can start on the skirt when I came to the realisation that I was going to have to do the exact same facing treatment on both sides (including the armhole), before I could sew the eyelets.


Suffice to say I REALLY wasn't looking forward to doing all that work again. I know it's got to be done but... OOH SHINY! Look over there at that linen for Dan's viking rus pants! You know he really does need pants more than I need a dress.

So I got started sewing the rus pants. And I decided I wanted to make them with french seams. I'm really not sure why since it will take twice as long. I guess I just really don't want to do that facing. I think it is also partly because I have never really mastered french seams. It's all well and good when its just a straight side seam, but I tried it once on a chemise and when I got to the underarm gussets or the gores it just became a mess. I was hoping that hand sewing rather than machine sewing might help too.
How to sew a french seam
And it did. Again no progress shots (damn you camera!!!) but here are the upper pants now with all the internal seams complete and the waistband turned down and stitched

Upper section of viking rus pants which will be gathered up and poofy
Inside view of crotch gusset
Detail view of french seams on a corner
I am so happy I finally got my head around the french seams on inserted gores/gussets. It's all about where you stitch to before you move the folded bit. If anyone wants a step by step explanation with pictures (I am sure I'm not the only one who has struggled with this) I can sit down and do it. Just let me know

So now I am doing the french seams on the lower leg section. Then all I need to do is gather up the bottom of each upper leg bit and attach it to the lower leg, and hem. Voila! Instant pants!

I have decided I'm going to inkle weave a drawstring. I found that idea somewhere else (can't recall where) and I will use the colours from this post although probably a more manly pattern like stripes :D

Thursday, 1 May 2014

Kirtle Progress and Silk Facings

So first things first. For some ridiculous reason I have decided to hand sew my dress. This is partially because I am lining it with canvas and I think my sewing machine would probably have objected to sewing through two layers each of wool, canvas, and cotton lining. Secondly, I find hand sewing quite relaxing and I like being able to do it in front of the TV. And lastly,  if I am going to the effort of sewing it all by hand I am hoping that my chances of stuffing things up along the way are going to be reduced. The down side is that this is making the process a WHOLE lot slower.

I managed to get the wool dried on Friday, but then I had a busy weekend involving a friend's wedding on the Saturday (Congrats Cec!), and a last minute trip to Lithgow for Ironfest on Sunday, which also ended up in an extra drive to Orange to say hi to my husband's parents. As a result we got home about 2 am and I've been trying to catch up on the lost sleep all week. So it wasn't until about Tuesday that I got the bodice pieces cut out. Now because I only have 3m of the red wool, I sat down for about an hour working out how I was going to lay it out so I could have at least a 3:1 pleated skirt. Now I was using a mix of cm and inches so forgive me if it's a bit confusing.

Wednesday, 23 April 2014

1550-1575 French Kirtle Pattern

Jonathon was nice enough to sleep for a few hours so I managed to get my kirtle pattern sorted. Thanks again to Lady Christine Duvant for her amazing bodice pattern. I was fortunate enough to be able to try on a pattern she had made for someone else and it fit me exactly. It just needed to be lengthened a bit as it sat right under my bust. I then altered the neckline and made the bottom edge dip slightly to fit with the French style gown I want to make. (Nb: The front pattern piece is not symmetrical because I am not symmetrical)

Lady Christine's Pattern
My adjusted kirtle pattern