While scouring the internet for more examples of period smocking to pin, I came across a lot of smocked aprons. I have been want to make an apron for a while now. Why not a smocked one?
This was by far the best one I came across. I loved the whole thing. I'm making that. The end.
This one came a close second.
I really liked how the first apron wrapped right around the sides of the wearer rather than being narrow and only at the front. I have a toddler and a preschooler who both get their grubby hands all over my skirts so I made sure my apron was super wide. Like 80 cm wide. Which meant I needed 2.4m of fabric (I went with a 3:1 pleating guesstimate which worked out spot on after smocking). The linen I had was 120 cm wide. My ideal apron would be about 80-90 cm long (waist to mid shin), which meant I would have been left with a random 30cm wide 2.4m long piece of fabric.
OR....
I could make two slightly short aprons?
I can't really justify not making two if I could. I might have been able to find a use for that leftover bit but then again I might not have and it would have been a total waste.
So two it is :)
 |
Rolling the fabric around a piece of dowel. This step is essential to prevent the fabric from
getting caught in the machine. Something I learnt the hard way. |
 |
| Smocking machine threaded and ready to go with 9 rows. I'm using pink thread as I will be removing these threads after I've finished the smocking |
 |
| Position the edge of the fabric |
 |
| Start pleating. Getting the fabric to catch evenly along the machine can be tricky. I poke it into the back of the machine using my nail or a small ruler. |
 |
| As the fabric builds up on the needles, gently slide it off the ends |
 |
| And then keep going |
 |
Until you've finished. Don't forget to tie your ends off. |
 |
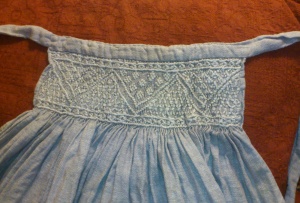
| First row of stem stitch. I'm using 100% silk embroidery thread |
 |
| Followed by two rows of honeycombs and another of stem |
 |
| And a wave. Half the pattern is complete |
 |
| All the smocking finished. The sides and lower edge have been bound with a piece of satin bias binding using stab stitch. I used two strips of linen 120x8cm for the waistband. This gave me a good length to tie it up, but meant I have a join right at the front. |
 |
| Finished apron |
 |
| You can see it goes right around my sides |
And there you have it. My beautiful smocked apron. And now I have another one to make :)

No comments:
Post a Comment